


Scrapbook Basics
If you have the good fortune to be taught by someone that knows everything there is to know about making scrapbook pages then count yourself truly blessed.
If, on the other hand, you are teaching yourself to do it then take heart and know that you will get better. I have proof! The video below is about my journey in teaching myself how to make scrapbooks.
This video was made for my daughter and you hear me refer to "Dad" a couple times. "Dad" is my awesome husband, Joe.
I'm not finished yet. There is still a lot more to cover so get comfortable. Within this section you will find information about selecting photos, choosing colors for your pages, using embellishments, creating your own embellishments, and the "RULE OF THIRDS" which I use sometimes but most of the time I just wing it. So does everyone else for that matter.
As you work your way through the whole process you will begin to know what your "tastes" are. The style you like. Some people prefer "Grunge" or "Shabby Chic". Some people love flowers, butterflies, and flourishes. Some people like their pages orderly and clean.
Just keep in mind this is YOUR art expression. The only hard and fast rule is "Be true to yourself".
If you are looking for classes in Scrapbook Making check your local craft/hobby store. Most Michaels Craft Stores have events lead by very knowledgable teachers that can help you through the process with themed classes. They can help you with the purchase of tools and supplies to get you started in this fun hobby.
You can learn all about using glitter, border punches, die cutting, stencils, glimmer mists, rubber stamping, and so much more in these classes.
Also, check in your area for independent scrapbook stores. They hold classes as well. There are fees charged for the classes at any place that holds them. Check with the store for details.

Layout Ideas For Scrapbooks
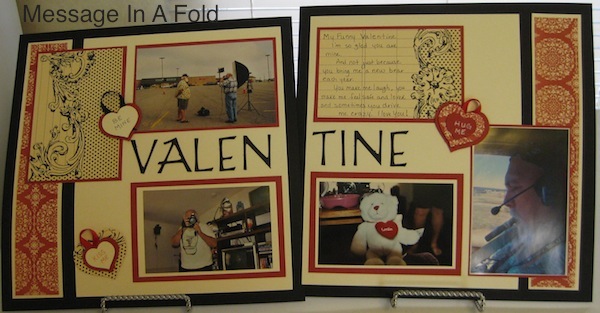
This is a Valentine's Day two page 12 x 12 scrapbook layout that I made of my "Valentine". There is no hard and fast rule about leaving a Title on one page. You can separate the Title, as I have done, if you find the word is too large to fit on one page.
How many photos HAVE to be on a layout? None. Some scrapbook artists create "Scripture Pages". Using their talent, scrapbook tools, and supplies whole entire scrapbooks have been filled with nothing but scriptures surrounded by decorative pages.
A scrapbook page consists of one (1) photo on up to 20. As you can see, from the photo in this section, I have four photos featured. I could have added two more leaving my journaling to either be hidden behind one of the photos or done on a smaller scale.
Mini Albums
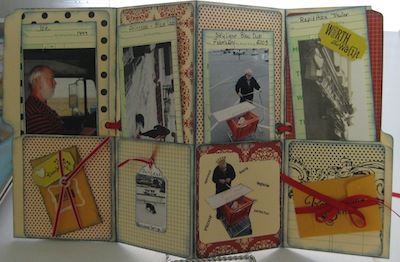
Mini albums can be made out of ordinary office supplies. A legal file folder creates the mini album, time cards create photo bases, coin envelopes for more photos and journaling, raffle/drawing tickets are for embellishment, merchandise tags are used for journaling and for photos.
Mini albums are made using a vast assortment of items. Chipboard shapes, paper lunch bags, card stock, plexiglass, just to name a few. Scrapbooks are not always 12" x 12".
Components of a Scrapbook Layout
How many times have you heard the following? "I made this layout in one afternoon and it ways EASY!"
Do you have this conversation with yourself? "If it is so "EASY" then why am I having so much trouble with the layout? There must be something wrong with me."
There is NOTHING wrong with you, so please let that bit of "trash talk" stop.
There are several components that go into a scrapbook layout that you may not be fully aware of. Just by looking at a layout completed by someone else you don't have the full picture of what all went into making it. Let me give you an example.
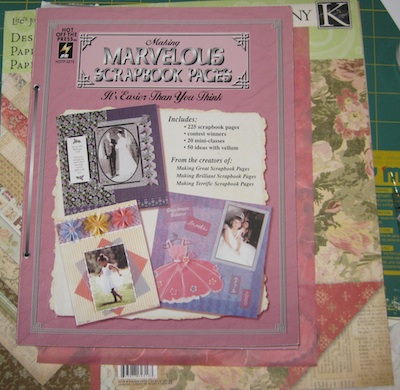
This is a book that I bought in 2003 during my binge shopping days. This is only one of the many books I have that hide away in a cupboard because every time I looked at these books I felt defeated and a total failure. Not to mention the amount of money I spent in trying to teach myself this craft and just spinning my wheels.
You can see, right on the front of the book under the title, it says - and I quote - "It's Easier Than You Think". To someone else it is "Easy" but to me it was anything but easy.
Why? What was I missing? What didn't I understand? I'm smart, as are you. Why does my attempt come out looking like one of my grandchildren made it?
I'm probably going to get in trouble by the Publishing Police and/or the people from Hot Off The Press, but I need to make a point here and help you understand about layout "construction". Once you understand this part of creating a layout then the rest will begin to fall into place.
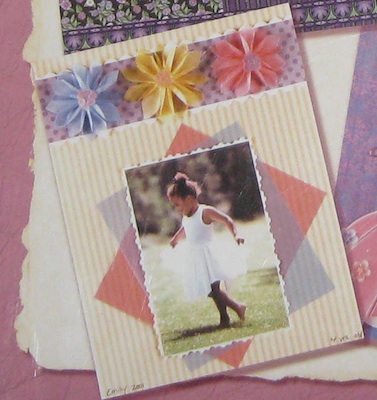
Take a close look at this darling layout. Can you see there are, at least, seventeen (17) different components that have gone into the creation of this layout?
What are the components? They are a combination of tools, the photo, and paper. You can, quite successfully, create this layout with the papers you have on hand. If you don't have all the tools to recreate this layout that is not a problem either. You just need to be able to look at a layout and visually take it apart and break it down into individual pieces. Let's begin. You may have to scroll back up as you go through the list to reference the photo a time or two, but you will understand in just a few minutes.
Dissecting a Layout
Paper: Did you know there are six (6) different pieces of paper on this layout? There is:
- Yellow and White stripe background paper
- Pink vellum
- Blue vellum
- Yellow vellum
- White card stock
- Purple polka dot print vellum
Do you see them all?
Tools: Did you know there are nine (9) different tools used to create this layout? They are:
- Decorative edge scissors used on the white card stock behind the photo
- A different decorative edge scissor used on white card stock under the purple polka dot print
- A paper trimmer to cut the white card stock, pink vellum, and the blue vellum behind the photo
- A template (copied from this book) to create the flowers that grace the top of this page
- A craft knife or scissors to cut the flower petals out of the vellum
- A bone folder to crease the flower petals
- An adhesive (probably a tape runner) to attach the photo to the white card stock matte behind the photo and to attach the white card stock strip at the top beneath the purple polka dot vellum, the tape runner was probably used on the center areas of the vellum beneath the photo to hold them in place on the background paper
- A hole punch to cut out a bunch of circles to create the flower centers
- A liquid type of glue to adhere the flower petal together and to attach the flower centers to the petals.
Analyzing a layout and separating out each of the components will help you with your supply list. The supply list consists of papers and tools you will need to create the layout. The photo is just the starting point.
If you don't have all of the tools to create this layout, don't think you have to run out to the store and buy something right now before you begin. If you don't have Any tools then you might have to make a list and purchase some. Follow along in the next pages here to see how you can create this type of a layout with the bare minimum of tools.