


RULE OF THIRDS
You will find information in books and on the internet about this rule. For me, most of the information was pretty vague. Written by people that knew what it meant and actively used it in their crafting. They spent a bit of time on the subject. Most of the time I felt like they were talking over my head. So if you find this section to be b-o-r-i-n-g, I beg your forgiveness. Once again, I muddled myself through this concept until I finally understood it. So here goes.
The authorities on this subject said, time after time, to imagine a Tic-Tac-Toe figure before your eyes. I don't know about you, but my brain doesn't work that way. It is either there in front of me or it is not. Imagining it doesn't make it so. The following is what I've come up with on this situation. Feel free to use this idea if it helps you to understand this concept.
Tic-Tac-Toe

This is for a 12 x 12 scrapbook album. The measurements for 8-1/2 x 11 will follow. I don't think I need to do this for the smaller sized albums, such as 6 x 6 and 8 x 8 since most of the photos will pretty much take up the entire page.
A Sharpie works best in this application. Other types of markers don't stay on the sheet protector like the Sharpie does. Make marks at 4 and 8 inches across the top of the 12 x 12 sheet protector. Then make the same marks of 4 and 8 at the bottom of the sheet protector and draw lines with the ruler connecting your marks.

If you make a mistake it is really easy to correct it. I made my lines at three (3) inch intervals and realized my mistake. Oops, have to clean it off.
Rubbing alcohol on a paper towel will take the Sharpie right off of the plastic sheet protector. Make sure you wipe the excess off with a dry paper towel before you use the Sharpie again to make the correct marks at 4 and 8. Now draw your lines connecting your marks top to bottom. Now do the same measurements on the right and left sides of the sheet protector and connect your marks.

You should now have a grid of three squares across the top, three squares through the center, and three squares across the bottom. Tic-Tac-Toe grid.
According to the "authorities" your photos are placed within the squares. One photo can take up the center square or one of the outer squares. As we go along through creating this layout you will see the process and it will, hopefully, make sense to you. For now, you just need to have the grid made. Depending on where you store this sheet protector, you may have to put the lines back on or fill in the gaps from the Sharpie rubbing off from time to time.

One Photo?

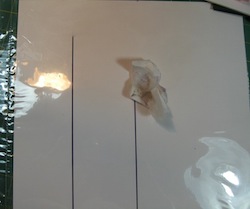
Do you have only one photo of an event? My daughter sent me this photo she took with her cell phone. I have some choices to make. First it would be the size of the photo. If you have a printer at home and photo paper that is 5 x 7 or 8 x 10 you could print the photo out larger. If you have to take a disk or flash drive to a kiosk and have it printed your choices would be the same. What size do you make it?
As you can see, the background paper is still a good choice for this photo but it doesn't look quite as exciting as it would if it took up more of the page. You might think it needs to be off center somewhere, but where?
Get Artsy?

First off, the "authorities" on this subject have said that you do not split a face in your imaginary grid. If I can't see the grid then how do I know if I'm splitting the face? With the aid of this sheet protector and the lines I've drawn I can see that I have, indeed, split his face into four areas. It doesn't look bad, but, what other items have you chosen to go on your page? How big are these items? How many do you have? Are your "embellishments" going to take over the page and the photo gets lost down there? I want the page to be about my grandson's dirty face and not about some store bought embellishments.
Add A Border?

Let's try to break up the page a little and add a border strip. I bought a thick stack of border card stock back in 2003. I still have most of that stack to this day. It is all the same length and width, in deep rich colors and I have forgotten that I have them.
Now, I could have taken three more of those border strips and laid them equal distances within the right, left, and bottom area of the grid than place the photo right in the center square. Didn't think of that until now, *sigh*. Looking at this photo you see the amount of background paper that is showing at the top and bottom of the border strip. That same distance would be kept in the other three outer edges. There would have been four small squares on all of the outer corners made by the intersecting border strips. There would have been four equal rectangles above and below, and right and left, of the border strips making an excellent frame for this photo. That is what you can do with just one photo. Please make sure that your border strips accent the page and don't detract from the photo you are so diligently trying to make the focal point.
Threes?
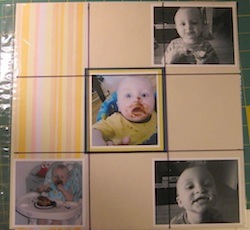
Do you REALLY have to stick with three of everything? No. This is a rule you can fudge a bit on. My daughter has sent me several photos of my grandson with his face smeared with different yummy foods. Of course, the prunes are still the focal point. The top and bottom right are of him eating an ice cream cone with the results all over his cute face. The bottom left is his first birthday and the chocolate cake he is enjoying. I have a separate layout of the smeared birthday cake and I've copied the photo several times and cropped it in different ways. His eyes with the cake smears, his nose totally covered, his mouth and fingers in another. You get the idea. I'll cover photo cropping in another section here.
As you can see, I've chosen to make two of the photos black and white. Mostly because he was moving around when the picture was taken with my daughter's cell phone and the image blurred a bit. So I have two (2) black and white photos and two (2) color photos. The way I dealt with the Rule of Three is that I've put the photos with food on a diagonal with the prune photo still as the center. This takes care of the "Rule" in a way that does not fracture the rule.
And, as you can see, I've put his entire face in each of the squares. I did not split his face with intersecting lines. One other thing about this layout. There is a theory that our eyes look at things in a "Z" pattern. I haven't quite figured that one out just yet. In this layout your eyes can travel from the top left to top right, go diagonally from top right to bottom left, then across the bottom to the right. This type of a layout does not strain your eyes or your brain when you look at it. You are not hopping from one photo to the next or going around in circles trying to find a resting place. Your eyes begin at the center where the focal point is and then follow around to the other photos. Although the photos are at different stages of my grandson's life the "Theme" is the same. His precious dirty face.
Measurements
As promised, here are the measurements for making the Tic-Tac-Toe grid on a 12 x 12 sheet protector and an 8-1/2 x 11 sheet protector.
For 12 x 12 you would place your ruler with the 12" mark at the right of the sheet protector. At the 4 inch and 8 inch ruler markings make a dot or a mark on the sheet protector BOTH top and bottom.
Next you will intersect these dots or marks and divide the sheet protector from top to bottom so you have three equal distant sections of the sheet protector from top to bottom with two solid lines.
Now do the same with the right and left sides of the sheet protector. Turn it so the "Right and Left" sides of the sheet protector are now positioned as "Top and Bottom".
Your two (2) vertical lines will now be horizontal.
Connect your dots or marks with solid lines and you will have a Tic-Tac-Toe grid to work with.
For the 8-1/2 x 11 sheet protector you will mark across the top and bottom at 2-7/8" and at 5-3/4". This will be 1/8" short of all three sections being the same width.
You can fuss around with it to make them equal if you need to, but these measurements will do for this purpose.
For the 11" length on the sheet protector you will mark across the right and left sides at 3-5/8" and 7-1/4". This time it will be 1/8" longer on one end but this is to be used as a reference tool.
You can be fussy and make it equal if you need to.
Remember, if you make a mistake in your line drawing you can always use rubbing alcohol on a paper towel to erase your mistake and start over.