


Getting The Most Out Of Your Paper
Card making can present quite a challenge as far as paper and scraps are concerned. Card stock and patterned paper, although relatively inexpensive, can become quite costly when you end up running out of a particular card stock you use as the base for your cards. You find you have tons of scrap but nothing big enough to make a card with. Trips to the craft/hobby store or waiting for the UPS or FedEx truck to arrive in time with your purchase can cause some frustration.
With today's economy being "iffy" and everyone is tightening their belts on buying items that don't put food on the table or pay for the roof over your head, justifying the expense of paper for your card making, often, takes a back seat to more important things.
With that said, and out of the way, I want to get you thinking about ways to use full sheets of card stock (both 12 x 12 and 8-1/2 x 11) and get more than one card out of the paper.
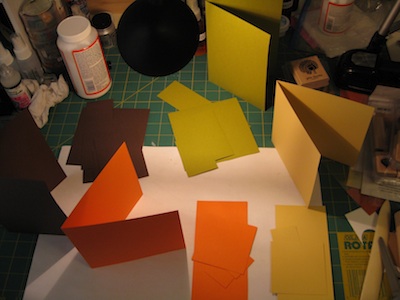
Papers Cut and Ready To Begin

The papers in this photo are two (2) 12 x 12 card stock and two (2) 8-1/2 x 11 card stock. Club Scrap has a FANTASTIC tool for making cards. Type in the search field card making deck. The cutting directions can be found on my blog Message In A Fold. You will need to have either a metal ruler and craft/hobby knife or a paper trimmer to cut the card stock to the dimensions described in my blog.
The paper colors do not matter, nor what these cards will eventually end up being. You can make four Thank You, Birthday, Get Well, Hello, or whatever cards you are working on. The possibilities are endless in your card creations with these cutting directions.

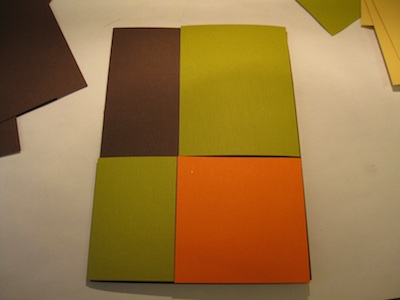
Card Bases
From the 12 x 12 and 8-1/2 x 11 card stock you will get four card bases plus an assortment of pieces to mix around on the card fronts. Use the assorted pieces with punches, dig through your patterned paper scraps, get out your embossing folders and add texture to some of the pieces, stamp images and sentiments, paw through your ribbon and fiber bits and pieces to see what you can use.
These cards are known as "Color Block" because of the different colors used in the "blocks". If you like to use your sewing machine to attach layers together this would be an ideal project. Your card front could become a quilt.
Should you decide to add a graphic element with patterned paper to the solid blocks I would recommend only placing the patterned paper inside the top block of the area you choose. To cut the patterned paper to fit the block you would do the following:
Measure the blocks width and height. SUBTRACT 1/2 inch from those measurements to get a 1/4 inch reveal of the solid block around the patterned paper. Likewise, if you only want 1/8 inch reveal of the solid block you would SUBTRACT 1/4 inch from the solid blocks measurements.
Block Design
Using one of the card bases you have cut from these directions, begin placing the pieces on the base. Don't adhere them just yet, you are now going to play with the color blocking. Try out some of your patterned paper scraps on top of one or more of the blocks. Do you have a stamp image and sentiment in mind? Think about where you would place the image and sentiment. Which one of the color blocks will you run through an embossing folder? Get creative. Make all four of the cards different so you have an assorted set of Thank You cards, or Birthday cards. Are you getting excited yet?
Finished Card
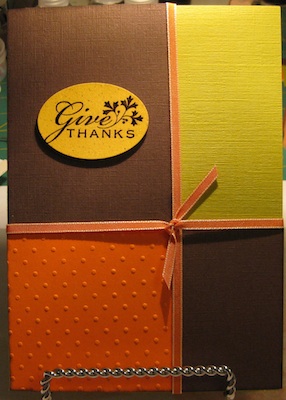
This is one of my finished cards from these color block directions. I can take a piece of scrap patterned paper, trim it down to fit within the area on the right side of the card, leaving a "reveal" of both the green and brown card stock pieces to jazz this up a bit. Measure the width of the top right green card stock and SUBTRACT 1/2 inch from the width measurement. The length area is seven (7) inches. SUBTRACT 1/2 inch from the 7 inches for 6-1/2 for the final length measurement.
Or take two pieces of scrap patterned paper and trim them both to fit within the right side card stock color block areas to really make this card sing.
In my example the brown at the bottom right of the card is the card base itself. Only the green card stock above is a separate piece of paper. Measure the green paper first, following the directions listed above EXCEPT only do the subtracting from the measurements of the green piece of card stock.
To measure for the brown area at the bottom right, only measure the exposed area that is left from the orange card stock and the green card stock. Measure the brown area and cut your patterned paper to leave a reveal of brown all the way around.
What would you do to this card? How would you make it "sing"?
Four Cards
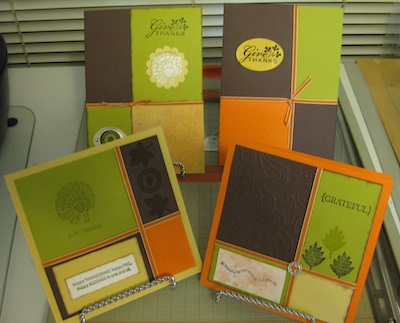
Here are the four finished color block cards that I've made using these cutting directions. I purposely kept them free of patterned paper to not confuse someone trying to figure out these cutting directions, since it can be tough to follow. I have a YouTube video that actually shows the cutting directions for this Color Block card set.
Put the excitement in your card making and become "Paper Savvy" by making the most of your paper supplies. Cut down on scraps by taking advantage of these cutting directions and dig into your other scrap paper and ribbons.
If you are new to card making, take advantage of using these cutting directions to get you started on the right path to making the most of your paper. Believe it or not, the scraps of paper that accumulate in drawers, sheet protectors, decorative baskets, or boxes can cause you to have "guilt trips". Feeling guilty for buying more paper while you have a growing stash of scraps. It can become quite a vicious circle.